
We turn one today!! Happy Birthday Cakes And More!
Thanks to all my friends and readers for helping me reach this milestone, look forward to your support and love for many many more years to come! Festivity and cheer continue to be in the air in our home post Christmas and New Year as hubby celebrates his birthday in the first week of January. Kids get all excited about the return gift he will 'have' to buy gift them! They hush-hush about the surprise small cards they make for him (right under his nose!) and give it to the groggy-eyed Dad first thing in the morning screaming "Happy Birthday's. My three year-old daughter drew a house, half-colored it and scribbled a curve, maintaining that it meant "Happy Birthday'. My eight- year old son, not to be left behind, made a pop up card with gizmos drawn all over it. They reluctantly went to school, thinking its unfair they must go with a birthday being celebrated at home. A promise of a dinner out and the ceremonial birthday cake does help in getting them ready to school. Whew!
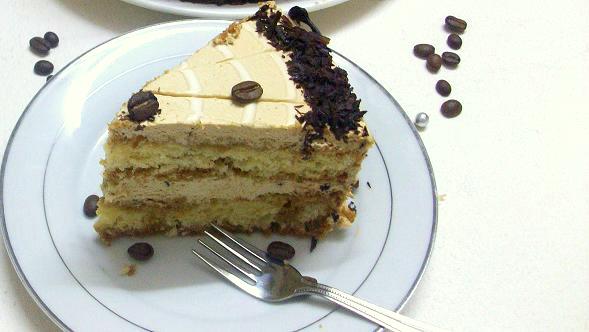
My passionate entrepreneur hubby takes off to work as usual promising to come home early - just when the kids' and my phone calls begin to get more and more frequent. And then I get to finish my cake baked the day before and hidden away. The allure of a coffee soaked cake, filled and frosted with coffee mascarpone is too much to resist for a die-hard coffee lover like me. I just needed that special occasion that would have me happily putting in that time and effort for this particular cake. A cake which has haunted me since long - Tiramisu Cake.
Though we do get mascarpone in Bangalore, I did of course have to go the whole hog beginning with making the mascarpone at home. I would be posting this later in another post as I don't want you dozing off by the time you read this already lengthy post :-). But then I want to write this in detail for those who would be attempting this for the first time and for my own reference.
Recipe adapted from Deb's Smitten Kitchen , original recipe by Dorie Greenspan. After reading all the reviews and comments posted on SK, I made a few minor modifications to the recipe. Thanks Deb, for answering the queries, giving so much more insight . Don't shy away from reading all the 125 comments posted, which can be quite helpful to get answers to any doubts or modifications which worked or did not work for others.

Tiramisu Cake
Baking: From My Home to Yours by Dorie Greenspan
For the cake layers:
2 cups cake flour ( Please refer note below )
2 teaspoons baking powder
1/8 teaspoon baking soda
1/4 teaspoon salt (I have omitted)
1 1/4 sticks (10 tablespoons, 3/4 Cup approximately) unsalted butter, room temperature
1 cup sugar
3 large eggs
1 large egg yolk
1 1/2 teaspoons pure vanilla extract
3/4 cup buttermilk ( I used homemade, please refer the note)
For the espresso extract: (add a tablespoon more of each in case you may need)
2 tablespoons instant espresso powder ( I used Nescafe Select)
2 tablespoons boiling water
For the espresso syrup:
1 cup water (original recipe has 1/2 Cup water)
3 tablespoons sugar (original has 1/3 cup sugar)
3/4 teaspoon vanilla extract (original recipe has 1 tablespoon amaretto, Kahlua, or brandy)
For the filling and frosting:
232 grams of homemade mascarpone, ( or one store bought 8-ounce container mascarpone)
1/4 cup confectioners’ sugar, sifted (Original has 1/2 cup, refer note)
1 1/2 teaspoons pure vanilla extract
1 tablespoon espresso extract (original has amaretto, Kahlua, or brandy)
1 cup cold sweetened whipping cream (original recipe has heavy cream)
1/4 cup mini chocolate chips ( original has 1/2 cup, refer note)
Chocolate-covered espresso beans, for decoration (optional)
Cocoa powder, for dusting
Getting ready:
Center a rack in the oven and preheat the oven to 180 degrees C / 350 degrees F. Butter two 9×2 inch round cake pans, dust the insides with flour, tap out the excess, and line the bottoms of the pans with parchment or wax paper. Put the pans on a baking sheet.(I have used a slightly smaller tin and used the same tin twice to bake 2 cakes, one after the other)
To make the cake:
Sift together the cake flour, baking powder, baking soda, and salt (if using)
Break each egg into three small separate cups. Working with a stand mixer, preferably fitted with a paddle attachment, or with a hand mixer in a large bowl, beat the butter on medium speed until soft and creamy. I have used my hand mixer .It took me about 2-3 minutes as my butter was really soft. Add the sugar and beat for another 3 minutes. I use my cell phone to time this. Add the eggs one by one, and then the yolk, beating for 1 minute after each addition. Don't laugh, but I count up to 60 for this:-) Beat in the vanilla; don’t be concerned if the mixture looks curdled.
Reduce the mixer speed to low and add the dry ingredients alternately with the buttermilk, adding the dry ingredients in 3 additions and the milk in 2 (begin and end with the dry ingredients); scrape down the sides of the bowl as needed and mix only until the ingredients disappear into the batter. Divide the batter evenly between the two pans and smooth the tops with a rubber spatula.The batter will be quite thick.
Bake for 28 to 30 minutes, rotating the pans at the midway point. When fully baked, the cakes will be golden and springy to the touch and a thin knife inserted into the centers will come out clean. Transfer the cakes to a rack and cool for about 5 minutes, then run a knife around the sides of the cakes, unmold them, and peel off the paper liners. Invert and cool to room temperature right-side up.
The cake was a little dense. A couple of other people including Deb also say the same, so I guess this is the way the cake is meant to be, probably as a very light butter cake would not hold up the syrup?
To make the extract:
Stir the espresso powder and boiling water together in a small cup until blended. Set aside.
To make the syrup:
Stir the water and sugar together in a small saucepan and bring just to a boil. Pour the syrup into a small heatproof bowl and stir in 1 tablespoon of the espresso extract and the vanilla or liqueur or brandy; set aside.
To make the filling and frosting:
Put the mascarpone, sugar, vanilla, and liqueur in a large bowl. Using a wire whisk, whisk just until blended and smooth. I have used the mascarpone straight out of the fridge. It was quite firm but turned quite smooth when whisked for a minute or two. Do not over whisk or beat.
Working with the stand mixer with the whisk attachment or with a hand mixer, whip the heavy cream until it holds firm peaks. Switch to a rubber spatula and stir about one quarter of the whipped cream into the mascarpone. This helps incorporate the whole thing well without knocking out the air from the whipped cream. Fold in the rest of the whipped cream with a light touch. The coffee mascarpone cream tastes just yummm!!!
To assemble the cake:
If the tops of the cake layers have crowned, use a long serrated knife and a gentle sawing motion to even them. Place one layer right-side up on a cardboard round or a cake plate protected with strips of wax or parchment paper.
Using a pastry brush or a small spoon, soak the layer with about half of the espresso syrup. I have soaked both sides of each cake. (I normally put the bottom cake layer on a flat plate, soak it and invert it on the cake platter or on the previous layer to minimize any possibility of breaking the soaked layer.)
Smooth some of the mascarpone cream over the layer – use about 1 1/4 cups – and gently press the chopped chocolate into the filling. Put the second cake layer on a flat plate and soak the top of it with half the remaining espresso syrup, then turn the layer over and position it, soaked side down, over the filling. Soak the top of the cake with the remaining syrup.
If the frosting looks as if it might be a little too soft to spread over the cake, press a piece of plastic wrap against its surface and refrigerate it for 15 minutes or so. Refrigerate the cake too.With a long metal icing spatula, smooth the frosting around the sides of the cake and over the top.
Decorate as you wish with cocoa dusted just before serving or coffee beans . This is my first attempt at making a chocolate border, inspired by Deeba. You are an artist Deeba!! I struggled to do this clumsy one!!
Refrigerate the cake for at least 3 hours (or for up to1 day) before serving – the flavors need to mature. The cake tasted best the day after I assembled it. So I think its best made a day ahead .i.e. 24 hours ahead. The coffee mascarpone cream was what I loved best about the Tiramisu.

Please Note :
Cake Flour : I made cake flour at home. I have measured out a cup of plain flour (scoop in the flour into the cup and level method), taken out 2 tablespoons of flour, added 2 tablespoons cornflour. This makes one cup of cake flour. I have made two cups of cake flour, sifted it 5-6 times. Sifting it a number of times helps the cornflour to get very well mixed with the plain flour.
Buttermilk: Source - Deeba. To make one cup of buttermilk, add 2 teaspoons of white vinegar to 1 cup of milk at room temperature. Let it stand for about 10 minutes. It will curdle. Use as needed. I use synthetic vinegar and it has worked well for me. Remember to take just 3/4 of this when u bake. Or do some Math and make just 3/4 cup buttermilk .
Sugar quantity used in the mascarpone: I have used only 1/4 cup as I have used sweetened whipped cream for the whipped cream. If you would be using heavy cream (which I assume will be unsweetened) or low fat unsweetened cream, 1/2 cup sugar as given in the original recipe may work fine.
Espresso Syrup : I have doubled the quantity as the quite some people felt that the cake was not soaked well and dry. In spite of using 1 cup syrup, I found the cake was not-that-moist and soaked it again with syrup after cutting the cake. This cake will not soak up the syrup like a fat-less sponge. Though I used syrup again after cutting ,the cake did not turn soggy even the next day as I had feared it would. In fact the cake tasted only better the next day!
You could add another half tablespoon espresso extract to the syrup for a more intense coffee flavor. I did not use more, though I prefer it intense as my kids would not like it that way.
Cake Layers: I think the cake would be better made as 3 layers. This will help soak the cake better. The cake tasted yumm the day after I assembled it. I would make the mascarpone again and use it with a fat-less sponge which will soak very well and hold up syrup like a dream.
Filling and Frosting: I would have liked a little more cream in my cake. I felt that the cake was more in proportion to the cream. I would use more cream (whipped plus mascarpone) I would also add a tablespoon more espresso extract to the filling next time.
Appropriate soaking time : The cake tasted best the day after I assembled it. So I think its best made a day ahead .i.e. 24 hours ahead.
Chocolate Chips in the filling : I have used 1/4 cup of chips in the filling as I wanted a more pronounced coffee flavor and not much of chocolate. I would use grated dark chocolate instead next time.
To plan this cake: Make the mascarpone and the cake the previous day evening.. Whip the cream too and chill. Assemble and decorate the next day. This will make making this cake easier.
Tiramisu Cake undoubtedly goes to my Blog Anniversary Event and I would be giving away a copy of The Cake Bible by Rose Levy Beranbaum.
This cake also goes to Champa's Bake Off