Monday, January 31, 2011

Nimbe Hannina Saaru - Lemon Rasam


Hot rice and piping hot rasam with loads of palya (vegetable) is one simple meal I really enjoy any day. Give  some good pickle to go with it and it becomes a gourmet meal for me. Rasam or saaru being a staple in the South Indian meal, I can never get bored of eating it. I like eating on a plantain leaf for the flavor it imparts to food, specially if the food is hot. We tend to eat more of rasam as compared to rice and its difficult to eat on one if you are not used to it, particularly rasam. I normally make it with  rasam powder, but hugely relish a change now and then. Hubby is not much of a rasam person, but likes this relatively non-spicy variation.


Nimbe Hannina Saaru or Lemon Rasam, along with a lot of other traditional recipes, bring back memories of my childhood visits to my maternal grand-parents' home. The huge family comprised of  lots of Uncles and Aunts, cousins, Tatas and Ajjis( as a kid left me confused as to who was who) and a few people who served the family for generations. The house had 2 huge kitchens with one of them meant for cooking lunch and snacks, the other one for the evening meal and cooking during festivals. The regular rasam was part of lunch and the Lemon Rasam was what was prepared invariably with the rest of the dinner. And how we used to anticipate and love eating it, with home-made ghee and the subtle smell of food cooked on wooden fire stoves.

I can still close my eyes and smell the rasam the way my grand-mother made it, but can never really bring that taste to it she brought. She had scores of small spice boxes on her kitchen shelf from which she would put 'something' into the huge vessels of food and it would taste magical. I do wish she were alive today, the foodie in me would have loved to pull out her culinary secrets...

Here is an attempt to share one of my most favorite dishes, hope you do enjoy it as much as I do..


The spices which go in to this rasam is a mix of roasted coriander seeds, cumin and fenugreek seeds. These are mixed and ground in a certain proportion and the powder goes into a number of dishes. I have tried to use them separately and am glad the rasam turned out to be almost the same as the one made with the spice mix powder. Here comes my version. This makes a liter of rasam which is neither too thick nor thin. The spice levels will be perfect for a liter of rasam. If you would be making more, you would need to adjust the spices accordingly.

Please Note: The flavor of this rasam is majorly from hing and of course the other spices. If you want to cut down on the hing, the rasam may not taste flavorful.
.
I normally have some fenugreek or methi roasted and powdered.  I have roasted coriander powder and jeera powder separately.

Ingredients:
Toor Dal - 1/2 cup
Tomatoes - 2 ripe, washed and chopped
Curry leaves - 1 medium stalk, washed
Fresh Coriander Leaves - A few un-chopped sprigs and more for garnish
Hing - a couple of generous pinches depending on how strong it is
Turmeric powder - 1 teaspoon(divided use)
Green chillies - 3-4, washed and slit lengthwise or chopped fine  
Salt to taste
1 tsp roasted coriander powder
3/4 tsp roasted jeera powder
1/8 tsp roasted methi powder

For the tempering
Oil- 1 teaspoon
Ghee - 1 teaspoon (optional)
Mustard seeds- 1 teaspoon
Hing
A few curry leaves

To finish: 
Finley chopped fresh coriander leaves
Juice of 1/2 a small lemon or 1 whole small lemon


Procedure: Pressure cook the dal with enough water and turmeric till soft. Whisk the dal with a wire whisk so that it becomes a homogenous mixture. Measure the cooked dal and add enough water to make a total of 5 cups. Keep aside.

In a heavy bottomed vessel, put the chopped tomatoes, green chillies, one whole stalk of curry leaves, a few coriander stalks 1/2 teaspoon turmeric powder, a generous dash of hing and salt. Cover it with water, just enough to cover the tomato mixture. Simmer on low heat till the tomato is cooked fully. This helps infuse the flavor of all the ingredients into the rasam. Stir occasionally.

Once the tomatoes are fully cooked, add the cooked dal and water. Bring to a boil, lower the heat. Add the roasted corainder powder, cumin powder and methi powder.  Simmer on low heat for about 10 -12 minutes. Check the salt and adjust if needed. Take off the heat. Discard the whole curry leaves and whole coriander leaves stalks.

Heat the oil and ghee in a small heavy pan or kadhai. Add the mustard seeds, when they sputter, add the hing and the curry leaves. If your rasam doesn't look a nice yellow, now is the time to add a little more turmeric, but not too much. Add the tempering to the hot rasam. What a satisfying sound!!! Squeeze in the lemon juice. Serve hot with hot steamed rice.


Please Note: To get the most of the lemon flavor, add the juice after heating the rasam and just before serving.

Sunday, January 30, 2011

Brown rice bisibele bhath

The last few weeks, my primary focus on the blogging front was renovation - replacing some of the old photos with "new and improved" pictures taken with my new Canon Rebel T2i. Well, a new camera is not going to magically improve my photography skills, but it's a start! Coming to the recipe, this is another tiny step towards replacing the empty calories of white rice with the nutritive value of whole grain brown rice. Statistics reveal that people who have 5 or more servings of white rice a week have a 17% increased risk of contracting diabetes while those who take 2 or more servings of brown rice a week have 11% lesser chance of developing the disease. This recipe particularly tastes great with brown rice. I would never ever make this with white rice again!


Ingredients (serves 2):

brown rice - 1/2 cup
split yellow pigeon peas (toor dal) - 1/4 cup
red gram (masoor dal) - 1/4 cup
tamarind paste - 1 tbsp
sambar powder - 1 1/2 tsp
ginger paste - 1/2 tsp (or a 1-inch piece of ginger - peeled and chopped fine)
mixed vegetables - 1 cup, peeled, grated/cubed as required (I use carrot, peas and cabbage)
salt - 3/4 tsp
bisibelabath paste - 1 tsp (optional)
clarified butter (ghee) - 2 tsp
cumin seeds - 1 tsp
fennel seeds - 1 tsp
cashewnuts - 1 tbsp, broken
curry leaves - 1 stalk
water - 4 cups

Method:

Heat a teaspoon of ghee. Add cashewnuts, cumin seeds, fennel seeds and curry leaves. When the cashwes turns golden, add washed brown rice, pigeon peas, red gram, vegetables, ginger, sambar powder and tamarind paste. Fry for a minute and add 4 cups water. Mix in the salt and pressure cook until soft. Stir in the bisibelabath paste and heat for a couple of minutes. Garnish with a teaspoon of ghee and serve hot.

Notes:
The cooking time for brown rice is much more than that of white rice - almost twice the time, depending on your equipment.

Saturday, January 29, 2011

The best beef bourguignon recipe ever

I realize that that down there doesn't look like much, but it was the best beef bourguignon I have ever made, so I have to share the recipe with you quick before I forget it, as it was one of those instinctive, improvisational ones


I have a feeling the reason it was so good was because I bought amazing stewing beef from Broadway Market, so it was made from happy cows. Or perhaps it was the cup of lamb stock I added, because I didn't have any beef... whatever it was, I hope we will all be able to replicate the magic by following this recipe

Ingredients (serves 2-3)

500g good quality stewing beef
Couple of handfuls of chestnut mushrooms, quartered
Onion, chopped
Handful of shallots, peeled and halved
Aprox 80g smoked pancetta cubes
Half a bottle of decent red wine
Fresh lemon thyme - 3-4 stalks
1 tsp dried thyme
3 cloves garlic
Garlic salt
Tablespoon flour
Cup of lamb stock
Bay leaf
Olive oil
Salt and pepper

Brown the beef in the olive oil, and fry the onion separately until golden and even a little crispy in places. Add the onion to the beef along with garlic salt, pepper and flour. Once you have mixed it all in, it's time for the wine, stock, bay leaf, thyme and lemon thyme - bring to the boil. Turn the heat right down and allow to simmer for at least an hour. Fry the pancetta in the same frying pan as the onions were in previously and after a couple of minutes, stick the shallots in there too. After about 20min, the pancetta should be crispy and the shallots golden - time to introduce them to the beef stew. At the same time, add the mushrooms. Cook for a further 45min-1hour, then season one final time before serving. The first night Ruby and myself ate this with garlic mash, and the second night I had it with some Turkish bread. Ruby got lost in the depths of deepest, darkest Hackney on the way to mine (or the end of the world as she now calls it), and was in a bit of a state by the time I found her, but said it had all been worth it when she ate this beef bourguignon - you can't really get any more endorsement than that. Although, after a night with coco the kitten bouncing off the walls and about 2 hours sleep, I think she may have changed her mind again

Friday, January 28, 2011

Aratikaya Allam Koora ~ Plantain Curry with Ginger


Ingredients :


Plantain : 1
Ginger : 1 inch piece
Green Chillies : 2 to 4
Mustard Seeds : 1/2 tsp
Chana Dal : 1/2 tsp
Urad Dal : 1/2 tsp
Curry Leaves : 1 stem
A big pinch of turmeric powder
Salt to taste
Oil : 2 tsp


Method :


Grind together ginger and green chillies into a paste and set aside. Wash, peel and chop the plantain into pieces and set aside. Heat oil in a vessel. Add the mustard seeds,chana dal and urad dal and let them splutter. When the seeds stop popping, add the curry leaves, chopped plantain, salt, turmeric powder and little water. Mix very well and cover with a lid. Let it cook completely. When it's done, add the ginger & green chillies paste and fry for another few minutes. Turn off the flame and serve with hot steamed rice with dollop of ghee.

Thursday, January 27, 2011

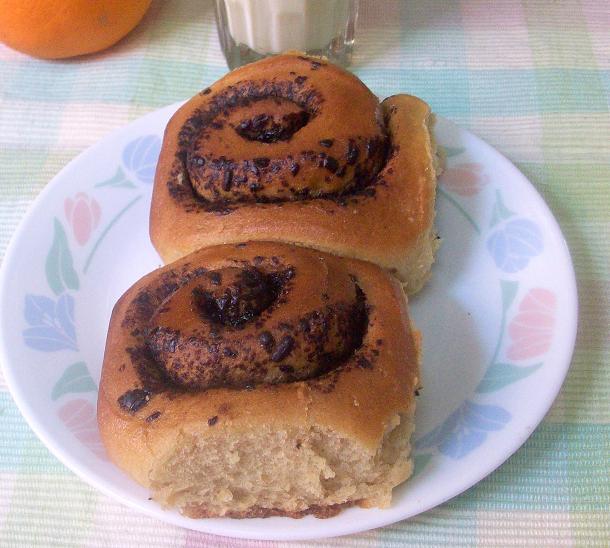
Orange And Chocolate Whole Wheat Rolls


If you could see me write this post, you could see the excitement I am barely able to contain!! I baked bread with whole wheat only and successfully!! I had tried this earlier a couple of times, but not with great results. The very first time I tried was when I had barely baked one good bread, and I failed... miserably. I had chosen a recipe not apt for a beginner and yeast let me down too. The bread turned out as dense as the Amazon forests. After the next attempt, I realized after I failed, that different kinds of wheat take different quantities of liquid. So in-spite of using my no-fail yeast, and a no-fail recipe, the bread was a failure. Yesterday, again, I garnered enough courage to try baking with whole wheat, hoping my past few successful breads have given me some sense of handling dough. And am so glad, I finally baked some Orange And Chocolate Whole Wheat Rolls, which taste good and are good textured too !

I baked this bread yesterday and again today just to make sure that the recipe will surely work. And I will tell you what worked better for me. Thankfully, good sense prevailed (at last!) and I have baked in small quantities. I am going to stick to this quantity like super-glue if I try another bread recipe I am not sure about. Sensible - thinks hubby, who will not risk being politically incorrect when I am in my 'obsessed - baking' state. If you are learning your way with breads, I very seriously recommend this quantity. And for beginners like me, I will share another seemingly almost insignificant but, result altering lesson I learnt...


Here is what worked for me...
 Ingredients:
Whole Wheat Flour - 1 1/2 cups (scoop and level method) I have used Ashirwad Whole wheat flour(refer note)
Vital Wheat Gluten - 1 1/2 tablespoons
Sugar - 2 tablespoons
Instant Yeast - 1 1/8 teaspoon ( I use Gloripan)
Water - 1/2 Cup + 2 tablespoons
Orange Juice - 2 tablespoons
Oil -1 tablespoon
Grated Orange Zest - 1/2 teaspoon
Salt - 1/2 teaspoon
For the Filling :
 2-3 tablespoons grated dark chocolate
1 teaspoon soft unsalted butter
                  OR
1 1/2 tablespoons sugar
1 tablespoon unsweetened cocoa powder
1 teaspoon soft unsalted butter  

Procedure: Combine the flour, gluten and salt in a bowl. Mix well. In another large bowl, take the sugar and the yeast. Add 2 tablespoons warm water. Add the oil . Mix the orange juice and zest in a small bowl  (this mixing is to make sure the zest does not get concentrated in one part of the dough). Add to the yeast mixture. Slowly add in the flour. Add the 1/2 cup of water and bring the dough together.

Oil your counter lightly and knead the dough for 12-13 minutes or till the dough becomes smooth and elastic. Kneading whole wheat is harder I realized. This is a real workout for your arms...which is good for toning them.. and I will say this only till I get a bread machine to do all the dirty work;-). Do not add more flour. The dough is very slightly sticky, but not much, but a dough scraper will come in handy anytime..Do not over knead. Cover the dough with a little oil.

Now for the little lesson I learnt : When working with small quantities of dough keep the bowl (in which you will proof the dough) proportionately small. I think it helps us beginners gauge the volume of the doubled dough better. Its easier to make out the dough doubled from half to up-to the rim rather than from quarter of the bowl to half the level of the bowl. Don't you think so? If you wait patiently till the dough doubles, you have better bread..

So grease a small bowl with oil. Place the oiled dough inside and cover with a clean kitchen towel. Keep the bowl in a warm place and allow the dough to proof. I normally keep inside my microwave turned off.In the meantime, get your tin greased and ready.

Grease the sides of a 10" * 6" rectangular tray and line the bottom with aluminum foil, grease it lightly.

Note: Whole wheat bread dough takes longer to double as compared to APF dough. Mine took 1 1/2 hours to double.

Once the dough doubles, punch it down gently. On a very lightly floured surface, roll the dough into a 20 cm * 24 cm rectangle approximately. Try to keep the surface even. Spread the soft butter on the rectangle. Spread the grated chocolate / cocoa-sugar mixture on it evenly leaving a small edge all around. Roll it from the longer side to form a log, like a swiss roll. Seal the edges well, pinching it very lightly, just enough to seal. If you do not seal, your rolls will 'open up'.

Now we need to cut the roll into equal sized 8 rolls. Well, I took a long scale (which I got for the kitchen specifically), and made small marks at 3 cm intervals. Then cut it with my dough scraper. Whew! Decent somewhat even sized looking rolls!! One roll cheated me and became slightly smaller - the one at the end of the log...


   Then cover the tray with a greased aluminum foil and keep in a warm place to double again. The rolls will look bigger than the ones in the picture below after almost 1 1/2 hours.
                                       
                              
Towards the end of the second rise, pre-heat oven to 177 degrees C or 350 F. Bake for 30 minutes till the top of the rolls become golden brown in color. Do not over bake or the crust will become chewy.


Remove the tin from the oven. Brush the rolls with melted butter(optional). Allow the rolls to come to room temperature. And then watch them disappear!! At the moment the remaining of the better rolls I baked today are sitting 'reserved' in snack boxes of my kids:-)


Flour: As mentioned above, liquid proportion varies form one variety of wheat flour to another, hence I have mentioned the brand I used.

Another note for fellow beginners: If you would be starting off with a bread recipe with only APF, do memorize the feel and consistency of the dough when you mix the same. This will help when you experiment with different flours.

The rolls I baked yesterday were soft too, but today's rolls were much lighter and better. The recipe remains the same, but I think the dough doubling (as compared to probably not yet doubled yesterday's dough) made a definite difference to the texture of the rolls.And yesterday's rolls has a slightly chewy crust as I had over-baked by a few minutes. And made me take them out in 30 minutes today - softer rolls..

The rolls were sweet, but not very sweet. You could try using low fat ganache or regular ganache or melted chocolate for the filling.

These rolls go to Champa's Bake-Off
Also, to Susan's Yeast-Spotting

Chukkakura Tomato Pachadi ~ Sorrel Spinach and Tomato Chutney

~ Chukka koora Tomato Pachadi ~

Ingredients :


Chopped Sorrel Spinach / Green Sorrel Leaves : 1 cup
Tomato : one small sized
Tamarind : small piece
Coriander Seeds : 1 tsp
Urad Dal : 1 tsp
Whole Red Chillies : 5 or6
A big pinch of fenugreek seeds
A pinch of turmeric powder
Salt to taste
Oil : 2 tsp

For Seasoning :

Mustard Seeds : 1/4 tsp
Chana Dal : 1/4 tsp
Urad Dal : 1/4 tsp
Cumin Seeds : 1/4 tsp
Oil : 1 tsp

Method :

Soak the tamarind in water for few minutes and set aside. Heat a teaspoon of oil in a frying pan. Add and fry the coriander seeds, urad dal and fenugreek seeds to light brown color. Now add the red chillies and fry for few seconds. Let it cool completely. Wash and chop the sorrel spinach and set aside. Heat a teaspoon of oil in a pan and add the chopped tomato and turmeric to it and fry for 5 minutes. Now add the chopped leaves and cook for another few minutes. When it's done, turn off the flame and allow it to cool. Grind the roasted spices into fine powder. Then add the tomato & sorrel spinach mixture, soaked tamarind and salt to it and grind into a paste. Transfer the chutney into a bowl. Heat a teaspoon of oil in a pan for seasoning. Add the mustard seeds, chana dal, urad dal and cumin seeds and let them splutter. Add this seasoning to the chutney and mix well. Serve with hot steamed rice and dollop of ghee.

Wednesday, January 26, 2011

a simple pleasure.

every once and a while i'll get an email from my dad with pictures of cricket attached and little messages like "come play with me!" and "come see me!"  it seriously brightens my day each time.  i instantly want to drop all my work and head on over.  i love that pup, and my dad.  she is one funny funny dog.

chocolate cupcakes with orange cream frosting.

the highlight of my weekend: baking these cupcakes.  i mustered up the strength to make them {after laying around all day} on saturday and boy oh boy were they worth it.  orange and chocolate are perfect together, i can't believe i just figured out how to pair them in cupcake form.  these are heavenly.

orange cream frosting
1/2 cup butter, softened
1/4 cup milk
6 cups powdered sugar
1 teaspoon orange extract
3/4 teaspoon vanilla
 food coloring

in a large mixing bowl beat butter until smooth. gradually add 2 cups of the powdered sugar, beating well. slowly beat in the 1/4 cup milk, orange extract and vanilla. gradually beat in the remaining powdered sugar. beat in enough additional milk to reach spreading/piping consistency. if desired, tint with food coloring. pipe or spread on cupcakes!

yuuuuuuuuuuuuuuuuuuum.

Tuesday, January 25, 2011

birthday dinner with the girls.

 
 remember how i said birthday week was over?  well...i forgot just one thing.  this fabulous dinner my friends had for me.  we went to california pizza kitchen and ate the most delicious food.  i think we ordered the best combination possible off their menu...you have to try it.  here's what you need to order:

spinach artichoke dip.
bbq chicken pizza with applewood smoked bacon {seriously so much better with bacon}.
the mac and cheese off the children's menu - so creamy and delish.

doesn't that sound amazing?  i can't wait to go back.  i love food.  and my friends! but mostly food...

Caramelized Pears With Roasted Almond And Vanilla Ice Cream


The SCS Group which promotes USA Pears, Washington Apples and California prunes, along with Caperberry hosted an exclusive tasting and lunch for food bloggers and food journalists recently. Which meant we would get to taste some pear recipes dished out by Chef Abhijit Saha, a very familiar face to me, a reader of Bangalore Food Lovers since the past few years. Having read much about Caperberry, I was looking forward to the event and eventually when I did attend it, it was a very pleasant experience. The beautifully lit restaurant with large suspended glass windows allows a profusion of natural light into the very elegant and chic dining area. Its hard not to notice this and harder not to feel envious of people who get to savor this natural light, a real luxury in city spaces. The restaurant also has an art gallery where art pieces from new artistes will be displayed and sold. As Shurthi Saha, wife of Chef Abhijit Saha put it, its a perfect place to see art in a very casual setting, even if you do not know the intricacies of painting and art.

Tasting and getting to know USA pears was a revelation in itself. Having eaten only the Chinese pears so far, I loved the taste and texture of the USA pears. Really juicy, sweet, buttery in texture, your taste buds will ask for more. They come in different colors,shapes and flavors allowing you to play around with them in your salads, drinks, main course and desserts. You could of course eat them raw, grill them or poach them and they will give you delicious results. USA pears are sodium free, fat-free, cholesterol free and an excellent source of Vitamin C. The best part of is pears provide 24% of your daily fiber intake. And for only 100 calories per serving! - Source USA Pears.

USA pears claim to be one of the world's finest pears, available in India from September to February. I would surely say yes to pears and their versatility. Absolutely loved it in the very refreshing Virgin Pear Sangria, in the Grilled Pears Stuffed with Cherry Tomato Mozzarella (wanted more of pesto sauce for the very first time!) and as the very delicately flavored saffron poached pears among other things.

And we all got to take home some pears as well as some prunes and I was itching to try out my hand at cooking pears. Being the dessert loving person I am, simple and quick, yet delicious, Caramelized Pears With Roasted Almond And Vanilla Ice Cream seemed to be the perfect dessert on a lazy Sunday afternoon.


Recipe inspired by a similar recipe on Pearpanache.com. Do check out this website for more ideas on cooking with pears, tips on how to use them.

This dessert is insanely easy to put together and real quick too. All you will need is just a few simple ingredients and you can have this impromptu dessert with no fuss, but a lot of dessert gratification.

Ingredients
  • Firm, ripe pears - 2
  • Roasted, chopped almonds - 4 tablespoons
  • Vanilla ice cream - 4 large scoops
  • For the caramel - From My Tartelette
    • 1 tablespoon (15gr) unsalted butter at room temperature
    • 2 tablespoons (30gr) light brown sugar, packed

Procedure:
Peel, core and halve the pears, retaining the short stem on one half. A melon baller is the best tool for coring the pears neatly.

In a heavy wide pan set over medium heat, melt the butter and sugar together. When the mixture starts to sizzle, place the pears, cut side down. Allow to cook for a minute. Flip carefully and pour some of the caramel on the pears. Cook for a minute more. The pears will release their juices, making the caramel sauce thinner. Do not over-cook. The ripe pears will be quite soft and cooking them for longer will cause the pears to become mushy.

Remove the pears carefully from the pan and place a pear half, cut side up, on each of the serving plates. Top with a generous tablespoon of crushed almonds on each pear. Serve with a scoop of vanilla ice cream immediately. Drizzle some left over caramel sauce on the ice cream if you wish.


I liked the bite to the pears when I ate my dessert. The crunch of the roasted almonds, the slightly firm and warm pears and the soft vanilla ice cream is a delight to the palate.

This fruit is definitely a winner and am looking forward to try more with pears...

This dessert is on its way to Ally's Delicious Desserts which comes with a yummy dessert book as a giveaway!


Monday, January 24, 2011

husband makes delicious food.

 weekend highlights:

-while sick, isaac cooked me breakfast, lunch and dinner alllllll weekend long.  it was all so good {see above!}.
-i finished reading the guernsey literary and potato peel pie society.  i loved it.  one of the best books i've read in a really long time.  i can't wait to discuss it in jana's virtual book club.  you can join us if you want!
-i baked for the first time in the new year.  i seriously can't believe i went sooooo long.  so so unlike me.  of course i made cupcakes. and they were delicious.
-husband and i caught up on all the new episodes of our favorite shows - did you see the office last week?  seriously hilarious, it's been a while since that show has made me laugh that hard.  watch it.
-lots and lots of naps.  we're talking 4 and 5 a day.  i love naps.  period.

despite feeling icky, it was a lovely weekend.  lounging around at home was just what i needed.  how was your weekend?

Thotakura Kandipappu Vepudu ~ Amaranth Leaves with Toor Dal

Thotakoora Kandi Pappu Podi Koora (Vepudu)

Ingredients :

Amaranth Leaves : 4 bunches
Onion : 1 big sized
Toor Dal : 1/4 cup
Mustard Seeds : 1/2
Chana Dal : 1/2 tsp
Urad Dal : 1/2 tsp
Garlic Pods : 2 or 3
Whole Red Chillies : 2 or 3
A big pinch of turmeric powder
Salt to taste
Oil : 1 tbsp

Method :

Put the toor dal in a pressure cooker and sprinkle very little water. Cook till 3 whistles. Switch off the flame and wait until the pressure go off. Wash and chop the amaranth leaves and set aside. Peel and cut the onion into small pieces and keep aside. Heat a tablespoon of oil in a vessel and add the mustard seeds, chana dal and urad dal and let them splutter. Now add the garlic pods and red chillies and fry for few seconds. Add the chopped onions and fry until light golden color. Now add the chopped leaves, turmeric and salt. Mix well, cover with a lid. Let it cook completely. When it's done, add the cooked toor dal and fry for another few minutes and turn off the heat. Serve hot with roti or rice.


Saturday, January 22, 2011

Cote Brasserie in London Bridge

I was stood up by my own father today. I wish I could say that this is a new low, but actually it's more of a long-standing tradition in my family


Anyway, this is where we always go out to eat when my dad is in town, and where I decided to dine alone today. Well, the food is really good and I was hungry


Normally, we order the Steak Tartare with french fries and green salad, and wash it down with a bottle of Blanc de Blancs, and sit outside next to the river. It's the best Steak Tartare I've eaten outside of France. Of course, my gran's isn't in the competition, because when she was in her heyday she made the best Steak Tartare in the world. Today, I ordered the Pissaladiere, up there, and a glass of kir royale to start. You may think that that would be enough for lil old me, but I decided to follow it up with duck fois gras on brioche with the recommended glass of Monbazillac desert wine. And boy, was I glad I did - so amazingly rich and creamy sweet!


I still have no idea what happened to my dad. The dozens of calls and texts have been unanswered. Perhaps I should be worried, upset or pissed off, but after my frustrated childhood all these exhausting emotions have been replaced by an almost Zen-like acceptance of the way things are. I figured that I need to practice dining alone for when I go traveling next year anyway. I don't want to spend six months feeling weird and awkward. I've also learnt that there's an art to people watching, without them thinking you are staring, or interested in taking them to bed. And that the staff in here are really lovely and friendly

Friday, January 21, 2011

Baked Plantain Crisps

In another attempt at a healthy snack, I started out briskly getting my ducks in a row - peeling the plantains, preheating the oven and pulling out the mandoline slicer, convincing myself "This time I will use this slicer without chopping off a chunk of my finger". Just as I was thinking so, ouch! A pool of blood and again, there goes a little piece of myself. Never once have I used my mandoline slicer without an accident, but on the bright side, I can take pride in my perseverance! Well, at least the results were worth all this trouble :)


Ingredients:

plantain (raw banana) - 2 large
red chilli powder - 3/4 tsp (adjust according to taste)
cumin powder - 1/2 tsp
turmeric powder - a pinch
oil - 2 tbsp
salt - 1 tsp (adjust according to taste)

Method:

Peel and slice the plantains evenly (without hurting your fingers unlike me ;) Heat oil in a sauce pan. Add red chilli powder, cumin powder, turmeric powder and salt. Mix well. Add plantain slices and mix well, just to allow the seasoning to coat the plantain slices. Bake in a preheated oven at 400 degrees (Fahrenheit) for about 30 minutes to make it crispy.

Notes:
Baking times vary from oven to oven. Bake for lesser time if you like it soft instead of crispy.

Dates and Roasted Gram Laddu


Ingredients :


Chopped Seedless Dates : 1 cup
Roasted Bengal Gram Powder (Dalia) : 3/4 to 1 cup
Milk : 1/2 cup
Grated Dry Coconut : 2 tbsp


Method :


Heat the milk in a pan and add the chopped dates to it. Cook till the milk evaporates. Turn off the flame and allow it to cool. Grind the dates into a paste. Add the dalia powder and mix very well. Make small balls out of the dates mixture and roll them in the grated coconut and serve.

You can also check other laddu recipes here.

miserable.

i am home sick today and am 100% miserable.  it is currently 5am and i'm up because my throat is on fire.  yes, fire. that's what i get for working prn at a kids urgent care - one of the first patients i checked a few nights ago coughed directly in my face when i was listening to her lungs.  gag.  i knew it was coming...{i wish my mom had told me about zicam a little sooner}...i'm just not used to working with such sick kids!  i mean, i work on the surgical floor at the children's hospital where all the children are obviously sick - but generally not the contagious kind.  i guess i'll be wearing a mask at the kidscare from now on.

i think i can fall back asleep now, have a lovely friday!  i'll be home reading the most lovely book - the guernsey literary and potato peel pie society, sucking on throat lozenges, and napping all day long. 

p.s. check out the comment section on yesterday's post.  hilarious. 

Thursday, January 20, 2011

wanted: beautiful seafoam watch.

you guys.  you guys.  iwantthiswatchsososobad.  so bad.  unfortunately, as part of my new years resolutions and the strict budget i've put myself on, it is currently a no-go. if only i had discovered it before my birthday and christmas!  poop.  someone please give me $160.  k thanks.  

someday this pretty little watch will be on my wrist.  someday.  it has my name written alllll over it.

Eggless Apple Pie - My first!


I just can't wait to show you my first Apple Pie! Well, my first pie ever to be precise! I had bought a pie tin and tartlet molds years ago without even the faintest idea as to what I would do with them. But of course never got to baking a pie for some reason I don't really know. Until I started to look for new things I can try. A pie seemed a good idea, specially since I had some Granny Smith apples in my fridge. I am the fruit eater in the family and have to generally push hubby and kids to eat fruit. But when I save fruit for a specific purpose, I have a tough time keeping them from eating it:). And my kids complain that 'I don't let them eat even something like a healthy fruit'! This in the context that my kids keep raiding the fridge for chocolates, butter or cheese slices which I painstakingly hide from their prying eyes. They do get away with eating some of these things, with and without my knowledge...sometimes with a chastising mini lecture and sometimes to allow some small kiddie indulgences..

The only time I ever tasted an apple pie was at a well known restaurant here and I must say, it did not really leave me wanting to go back there for more. And to think we ate the pie on the recommendation of the staff there!! And of course it also put me off the idea of me wanting to bake one at home. The home-made pie however, made a nice change from the regular tea-time treat, the buttery and crumbly-crisp shell a perfect contrast in texture to the slightly tart, soft, cinnamon flavored apple filling. An enjoyable treat if you love the cinnamon-apple combo...


I admit, I was not very sure of posting this one here, as I thought the pie does not look good enough. And the other reason - don't look at me like that, but I am not really head-over-heels in love with cinnamon in my desserts.  But then, everything does not need to be picture perfect, I am experimenting with things. I may love some results and when I do, I go ga-ga over it. And if I don't love the result I will surely mention that here too! Rest assured, I may post an odd recipe which may not be to my taste, but not recipes which can't be tried successfully.

The eggless pie shell or the crust recipe is good and you can play around with different fillings, fruit based or fillings like cream cheese-almond meal, pastry cream, meringue and many more. You could also replace the sugar with a teaspoon of salt and try a savory filling, which I think I will try sometime. 

Recipe from Joy Of Baking. I have halved the crust recipe and baked the pie in a 6 inch tin (original has a 9 inch tin) and 3 tartlet tins. The shell has been baked blind which is a small deviation from the method in the original recipe. I have also skipped the lattice on top and kept the pie open. Baking blind is a term which means baking the pastry shell before it is filled. The shell is pricked with a fork to prevent it from rising, It is lined with parchment and filled with a weight such as dried beans. The weight is removed a few minutes before the baking time which helps the crust to brown evenly - source Epicurious. I baked blind as I was not very comfortable with the idea of baking the shell straightway with the filling in it.

Pate Brisee (Short Crust Pastry):

175 grams all-purpose flour
1 tablespoon granulated white sugar (replace with 1 teaspoon salt for a savory crust)
1/2 Cup / 113 grams unsalted butter, chilled, and cut into 1 inch (2.5 cm) pieces
2 to 4 tablespoons ice water ( I used only 2 tablespoons)
(I have omitted the 1/2 teaspoon salt, use if you wish)

Method: Combine the flour and sugar (and salt if using) in a bowl. Mix well. Add the chilled butter and rub in with your fingertips till the mixture resembles bread crumbs. Add 2 tablespoons cold water. Add more water only if needed. The dough should just come together and hold when pinched. I have used only 2 tablespoons and it worked just fine. Knead very briefly. Alternatively, you could use a food processor for the entire procedure. 

Cover the dough in plastic wrap and refrigerate for an hour before using. Make the filling in the mean time. After the dough has chilled, take the pastry and roll it on a lightly floured surface into a circle 12 inches in diameter( take 2/3 pastry and roll into a 9 inch diameter circle if you would be using a 6 inch pie tin like me) Did I tell you I am bad at Math?? If you want to save all these complex calculations, just use a 9 inch tin. I would have used too, if not for the sad part of my small oven:-(. You could use good cling film and roll the pastry perfectly as Rachel Allen does. I tried to do it, but since I am not Rachel Allen, it did not work. And I choose to blame it on the cling-film which stuck firmly around the edges of the dough and did not budge much when rolled. Ensure uniform thickness as you roll. 

Gently transfer it to the pie tin and trim to fit the edges. Press it gently to fit into the ridges and dust off any excess flour. Yep, since I did not do a good job of pressing it into the ridges, the ridges are not very prominent. Prick the pastry with a fork on the surface, cover it with a cling film and rest it in the fridge for 15 minutes.

Pre-heat oven to 180 degrees C. Line the pastry with parchment and fill it with beans (I used kidney beans). Bake for 15-20 minutes or till the pastry feels dry. I baked for about 25 plus minutes. Remove the parchment and the beans, bake further for about 10 minutes till the crust looks golden brown. Remove from the oven, cool completely.

For the filling: (Please Refer note)

Rose Levy Beranbaum's method of of macerating the apple slices (instead of just mixing them with spices etc and directly using them) in sugar so that the natural juices in the apples are released is used here. The released juices are cooked, reduced and poured on the slices later.  So when you bake the apples, they will not shrink any further and helps avoid a gap between the apples and the top crust. I have made an error of judgment with the quantities of apples, hence the gap.

Apple Filling:
1.1 kgs apples, peeled, cored, and sliced 1/4 inch thick (a firm variety works better, I have used Granny Smith)
1/4 cup (50 grams) granulated white sugar
1/4 cup (55 grams) light brown sugar
1 tablespoon lemon juice (alter to suit your taste, but don't skip)
1 teaspoon ground cinnamon
1/4 teaspoon ground nutmeg
1/4 teaspoon salt ( I skipped this)
2 tablespoons (28 grams) unsalted butter
1 tablespoon plus 1 teaspoon (15 grams) cornstarch (corn flour)

To serve:
Softly whipped cream or vanilla ice cream

Method:  In a large bowl combine the sliced apples, sugars, lemon juice, ground cinnamon, nutmeg, and salt. Let the apples macerate at room temperature for 30 minutes to three hours. Then, place the apples and their juices in a strainer that is placed over a large bowl (to capture the juices). Let the apples drain for about 15-30 minutes or until you have at least 1/2 cup (120 ml) of juice. Spray a 4 cup (960 ml) heatproof measuring cup with a nonstick vegetable spray, and then pour in the collected juices and the 2 tablespoons (28 grams) of unsalted butter. Place in the microwave and boil the liquid, on high, 6 to 7 minutes or until the liquid has reduced to about 1/3 cup and is syrupy and lightly caramelized. (Alternatively, you could place the juices and butter in a small saucepan and boil over medium high heat on the stove, stirring continuously, this will take a 2-3 minutes approximately. Cool.  

Transfer the drained apples slices to a large bowl and mix them with the cornstarch (corn flour). Then pour the reduced syrup over the apples and toss to combine.  Pour the apples and their syrup into the pie crust. 

Place an aluminum foil on the baking sheet in your oven and keep the pie tin over it. This will help catch juices. I have baked in an oven pre-heated to 180 degrees C(350 F) for about 55 minutes. The apples should feel tender, but not over cooked or mushy. 

Stephanie recommends eating the pie after a few hours of baking it and not right away.


Note:  

Filling : If you halve the crust recipe and bake an open pie, the amount of filling would be the same. Adjust the amount of sugar according to the tartness and variety of apples you would be using. Cinnamon and nutmeg would be to your taste. Even though reduced the amounts, I personally found the amount of cinnamon and nutmeg a little too overwhelming. 

I fell short of apples(error of judgment) and hence my pie has less filling. Since the quantities of ingredients in the filling like sugar and spices depends largely on the tartness of apples and personal taste, I have given the recipe as in the original.

You tell me! In spite of my novice with pies and mixing baking methods, the crust was still quite crisp and good even the next day, so am hoping I haven't done anything that goes totally against the grain of baking pies.

The pie goes to Ally's Delicious Desserts, she is giving away Wicked Desserts with 100 sinful  dessert recipes!  Doesn't this cover look good enough to eat??


Am sending the pie to Champa's Bake - Off  


Wednesday, January 19, 2011

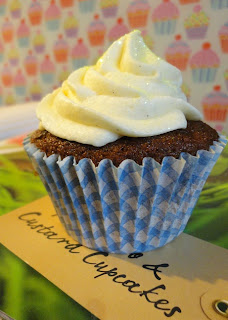
Sticky toffee pudding with custard


Sticky toffee pudding and custard - don't those words just make you drool? Surely it can't just be me?

Last week was cold, wet and miserable. The fun and frivolity of Christmas/Hogmanay seems a long way away and January seems to take forever to be over, and is always a little grim. What I needed was some comfort food. A hug in cupcake form.


I have made sticky toffee cupcakes with caramel frosting before so the cake was a doddle for me. I really love this recipe. I could make it over and over, and eat it again and again. Till I popped.

The cake once again came out sticky and date'y and just scrumptious. There is no other word for it - scrumptious sums it up fully.

I used the Love Bakery custard frosting recipe I had previously topped my rhubarb and custard cupcakes with.  I added the specified amount of custard and it just didn't taste custardy enough, so I added more. And some more vanilla as I like my custard to be full of vanilla goodness. Alas I added a smidgen too much custard and the frosting was a little wetter than I'd have liked - it tasted fabulous but didn't pipe so well.


The cakes kept well for 3 days, the flavour maturing in the cupcake over time and the base remained moist until they were all gone.

sparkly, sparkly nails.

one of the best parts of my job is spending time with my little patients. it doesn't happen very often...but this weekend i took care of the sweetest little 10 year old, and i actually  had time to hang out with her {i am usually running around like a crazy person}.  we watched hannah montana while she painted my nails sparkly pink.  aren't they cute?  unfortunately they got a little chipped right after due to my nurse duties, but i love them nonetheless.  she also made me some pretty jewelry and a feather pen.  after 2 days of caring for her i left one spoiled, happy nurse.  

i love my job.

Tuesday, January 18, 2011

10 out of 10 for 40point5


Last Saturday after visiting the beautiful Peggy Porschen's Parlour we walked through Hyde Park to Kensington High Street to get to the second destination of the day – 40point5.

I first read about 40point5 in Daily Candy a couple of weeks ago and was immediately won over by their patisserie section on their website.

The shop is attached to a small cafĂ© next door, which unfortunately was v.popular and therefore v.busy so we got our goodies to take away. The lady in the store was lovely – telling us about the chocolates and letting us choose a free sample to try. The chocolate was divine and I highly recommend it to anyone who likes good chocolate. They also had a range of chocolate gifts, such as shoes, guitars and really nice chocolate skulls.

There were two cupcakes on offer – a spiced plum and a tiramisu. I opted for the tiramisu, hoping as this was a cupcake tasting session Manny would opt for the spiced plum. He didn’t. For him it was lust at first sight with a chocolate torte and there was no way anything else was going to tempt him from this Chocolate Nemesis 


I have to admit being slightly disappointed that the devils food cupcake hadn’t been available – until I tried the tiramisu. It was delicious. The cake was incredibly tasty and full of boozy goodness as well. And the topping was light and melted in my mouth.

My only criticism is the cakes were kept cooled so they may not be so good if you ate them straight away – however ours had the trip home and the time it took to boil the kettle to get to room temp.

I shall definitely pop by again when I’m in the area to see if they have more cupcakes, and to buy chocolate gifts!

temple date night.

  one of mine and husband's new years resolutions is to attend the temple together at least once a month.  well, for january we can add a big check mark next to january on our list {little fact: i loooove making and checking off lists!}  isaac took me on friday night for a little date night, followed with some frozen yogurt.  it was just what i needed, i just love my isaac.

Monday, January 17, 2011

my husband is a funny, funny man.


isaac recently posted this video {along with a few others that are hilarious!} and i couldn't help but share it.  watch it.  and then go to his blog, he who laughs, to watch the others.  you won't regret it.

Spicy mung beans and rice

When will I ever learn not to get drunk on Sundays? Really, I'm old enough to know better


The thing is that, recently, my weekends have actually been quite sensible, it's just those bloody Sundays I can't get under control. Of course, it's always fun at the time otherwise I wouldn't do it. But what I was really looking forward to the whole of last week was having the whole of Saturday to myself, in my flat. I spent it pottering round, cleaning, doing laundry, reading cookery books and generally sorting stuff out. And in the evening, rather than going to a party, I chose to watch series 2 of The Mighty Boosh. Heaven. I also made this mung bean dish. This is a first for me as I've never cooked mung beans before. Previously, I've used this recipe for lentils and thought it could work. It did. Even better than with the lentils, which tend to fall apart. The measurements down there make about 4 portions

Ingredients

250g brown rice
250g mung beans
2 red chillies
Small onion
2-3 inches ginger
Garlic clove
2 tblsp garam masala
Olive oil
Butter
Salt

Soak the mung beans according to packet instructions. Fry the chopped chillies, garlic, ginger and onion for a couple of minutes in a mixture of olive oil and butter, then add the garam masala powder. Add a tiny bit of water so that the spices don't burn. After a few minutes add the mung beans and rice, and cover with a couple of inches of water. Bring this to the boil, then cover and allow to simmer for about half an hour. Add salt. Keep making sure that it is still liquidy and add more water if it dries up. After half an hour, try a tiny bit and see if it is soft, if not cook for a further 10min. Finally, add some more butter and fluff it all up gently. It's really nice served warm with a fried egg and some tabasco (if, like me, you're a heat addict), or cold as a bean-rice salady type thing